We recently published step-by-step instructions for the etracker basic integration in our blog. This basic integration already provides a nice amount of data, which can be sufficient for many sole proprietorships and SMEs.
However, if you want to delve a little deeper into web analysis with the help of etracker Analytics, we believe there is no way around activating cookies on etracker so that, among other things, significantly more data is collected from returning visitors.
Especially for larger companies with larger marketing budgets, it is advantageous to be able to analyze the customer journey of their customers in the best possible way. And if this is also 100% GDPR-compliant with the help of a Consent Management Platform (CMP) like Usercentrics, all the better!
In the following we will show you in detail how you can activate etracker cookies in order to receive even better data in your etracker reports.
The basic requirements are the existing basic integration of etracker Analytics and the presence of a Usercentrics account (CMP v2) and a Usercentrics cookie notice on the website to be analyzed.
Adding the Data Processing Service (DPS) “etracker” in your Usercentrics interface
The first step is to add the Data Processing Service (DPS) “etracker” in your Usercentrics interface:
- In the Usercentrics interface, click on Service Settings in the left sidebar.
- Under the Service Settings heading, click on the Data Processing Services tab.
- Now click on the Add DPS via Database button.
- Enter etracker in the first search field (Select DPS from database) and select etracker (please do not use “etracker without cookies”!)
- Under Category, select the Marketing category.
- Under Version (DPS Details), choose the one that suits you: either Keep Service automatically updated to latest version or Stay on current version.
- Click on the blue Add DPS button
The data processing service “etracker” has now been added, see:
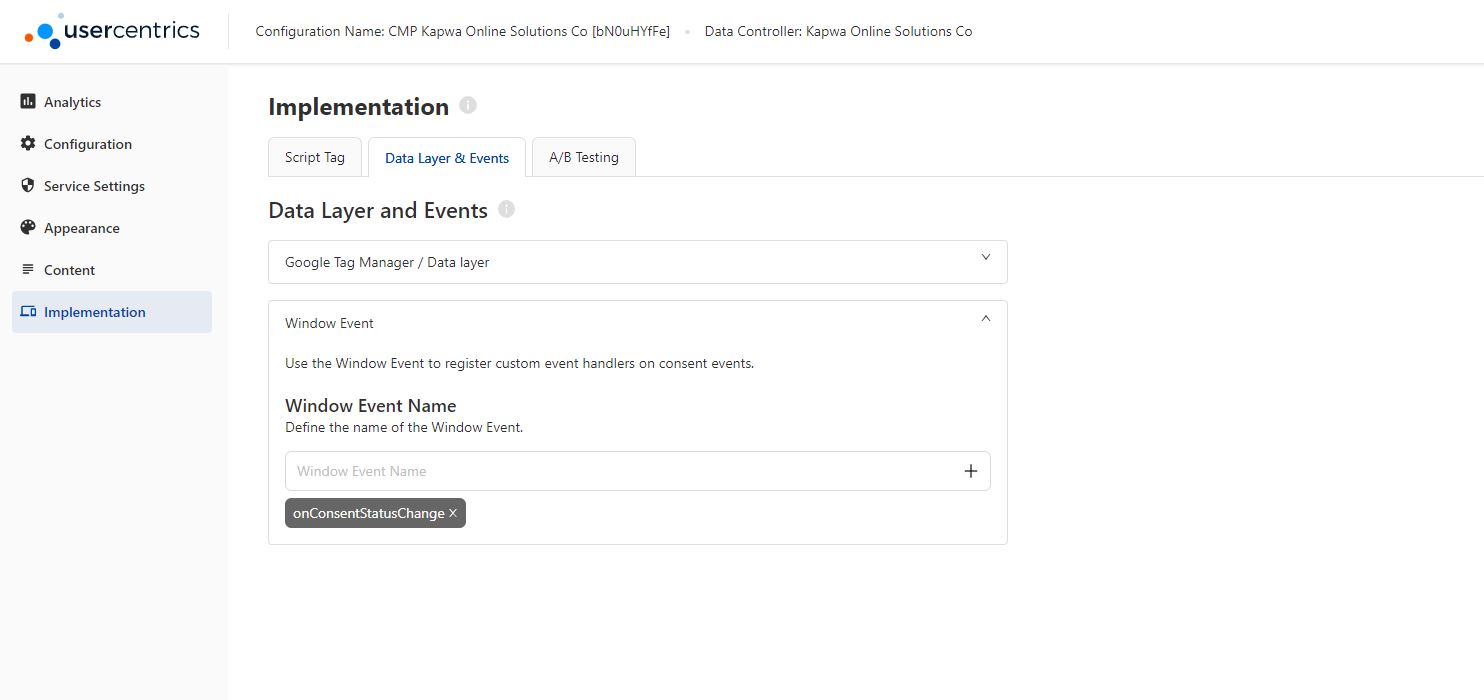
Adding the window event onConsentStatusChange in the Usercentrics interface
The second step is to add the “onConsentStatusChange” window event in your Usercentrics interface:
- In the Usercentrics interface, click on Implementation in the left sidebar.
- Under the Implementation heading, click on the Data Layer & Events tab.
- Now click on the Window Event field.
- Enter onConsentStatusChange under Window Event Name correctly.
- Finally click on the plus sign.
The window event onConsentStatusChange is now added, see:
Finally, simply click on “Publish” in the lower left corner so that your new changes are also saved!
On the corresponding website on which the Usercentrics script is integrated, “etracker” is now also displayed in the privacy settings under Marketing:
The third step is to add the etracker script for etracker cookie activation on your website to be analyzed. In order to connect the permission granted via the Usercentrics cookie settings to set etracker cookies with the etracker API call enableCookies or disableCookies, the following script must be used directly after the etracker standard tracking code:
<script>
  function etrackerSetCookieConsent(e) {
    var data = e.data || e.detail;
    if(data && (data.event === 'consent_changed' || data.event === 'consent_status') && typeof _etracker !== 'undefined') {
      if(data['etracker'] === true)
        _etracker.enableCookies('mydomain.com');
      else if (data['etracker'] === false)
        _etracker.disableCookies('mydomain.com');
    }
  };
  window.addEventListener('onConsentStatusChange', etrackerSetCookieConsent, false);
</script>
As already mentioned in our instructions for the etracker standard configuration, we recommend direct integration (without a plugin and without Google Tag Manager). Since we use WordPress and a child theme with header.php on kapwamarketing.com, we embed the code in the corresponding file directly after the etracker tracking code:
After this third step, the etracker cookie activation – from the technical side – is successfully completed. It is best to check the integration and your data protection declaration again. The data protection notice provided by etracker itself should definitely appear in your data protection declaration!
If you have successfully activated the etracker cookies, you will soon receive better data in your etracker reports. For example, you will now see the Percentage of visits with cookies, see:
Companies that want to collect as much data as possible for their web analysis should definitely use the etracker cookie activation if they use etracker Analytics. Thanks to this great feature, you can get much better data on returning visitors and the customer journey of your customers.
It is important to use a professional CMP for the GDPR-compliant setting of etracker cookies. Above all, the use of Usercentrics (CMP v2) is recommended here.
Note: If you still use Usercentrics (CMP v1), you will find the right instructions here (similar to the above)!