Many advertisers who are currently looking for legally compliant Google Analytics alternatives due to TTDSG (Telekommunikations-Telemedien-Datenschutz-Gesetz) and GDPR (General Data Protection Regulation) need a tool that enables them to evaluate Google Ads visitor traffic and conversion data. But not many alternatives to Universal Analytics and/or GA4 can deliver exactly that.
An analysis tool that represents a very good solution here is etracker Analytics. This is because etracker Analytics offers accurate campaign tracking and the extremely useful Google Ads Conversion Upload function. Or to put it another way: If you set up and use etracker Analytics correctly, you have a great opportunity to efficiently analyze Google Ads campaigns without using Google Analytics.
In the following we will show you how you can use etracker campaign tracking to get accurate Google Ads data and import etracker website targets (conversions) into your Google Ads performance reports.
Parameters for Google Ads Final URL Suffix field
Some advertisers will not (yet) know the Google Ads field used for etracker campaign tracking. It’s called “Final URL Suffix” and it was created to enable campaign tracking with third-party providers as well. The suffix (Latin suffigere = to pin below) is pinned to the final ad URL.
But where can I find the suffix to be able to use etracker campaign tracking in Google Ads?
- Click on Marketing Reports in the etracker Analytics Interface.
- Under Sources, click on the magic wand next to Paid Media.
- In the Google Ads Upload tab, under Tracking, you will now find the parameters that are used as the final URL suffix in Google Ads.
These parameters predefined by etracker must now be entered as a final URL suffix. However, please make sure that you replace CAMPAIGNNAME with the correct campaign name.
Example:
For example, if your Google Ads campaign is called Google Ads Conversion Upload, then please replace CAMPAIGNNAME with Google_Ads_Conversion_Upload.
There are basically three levels on which you can enter the parameters from etracker in your Google Ads account as a final URL suffix: the campaign level, the ad group level and the ad level.
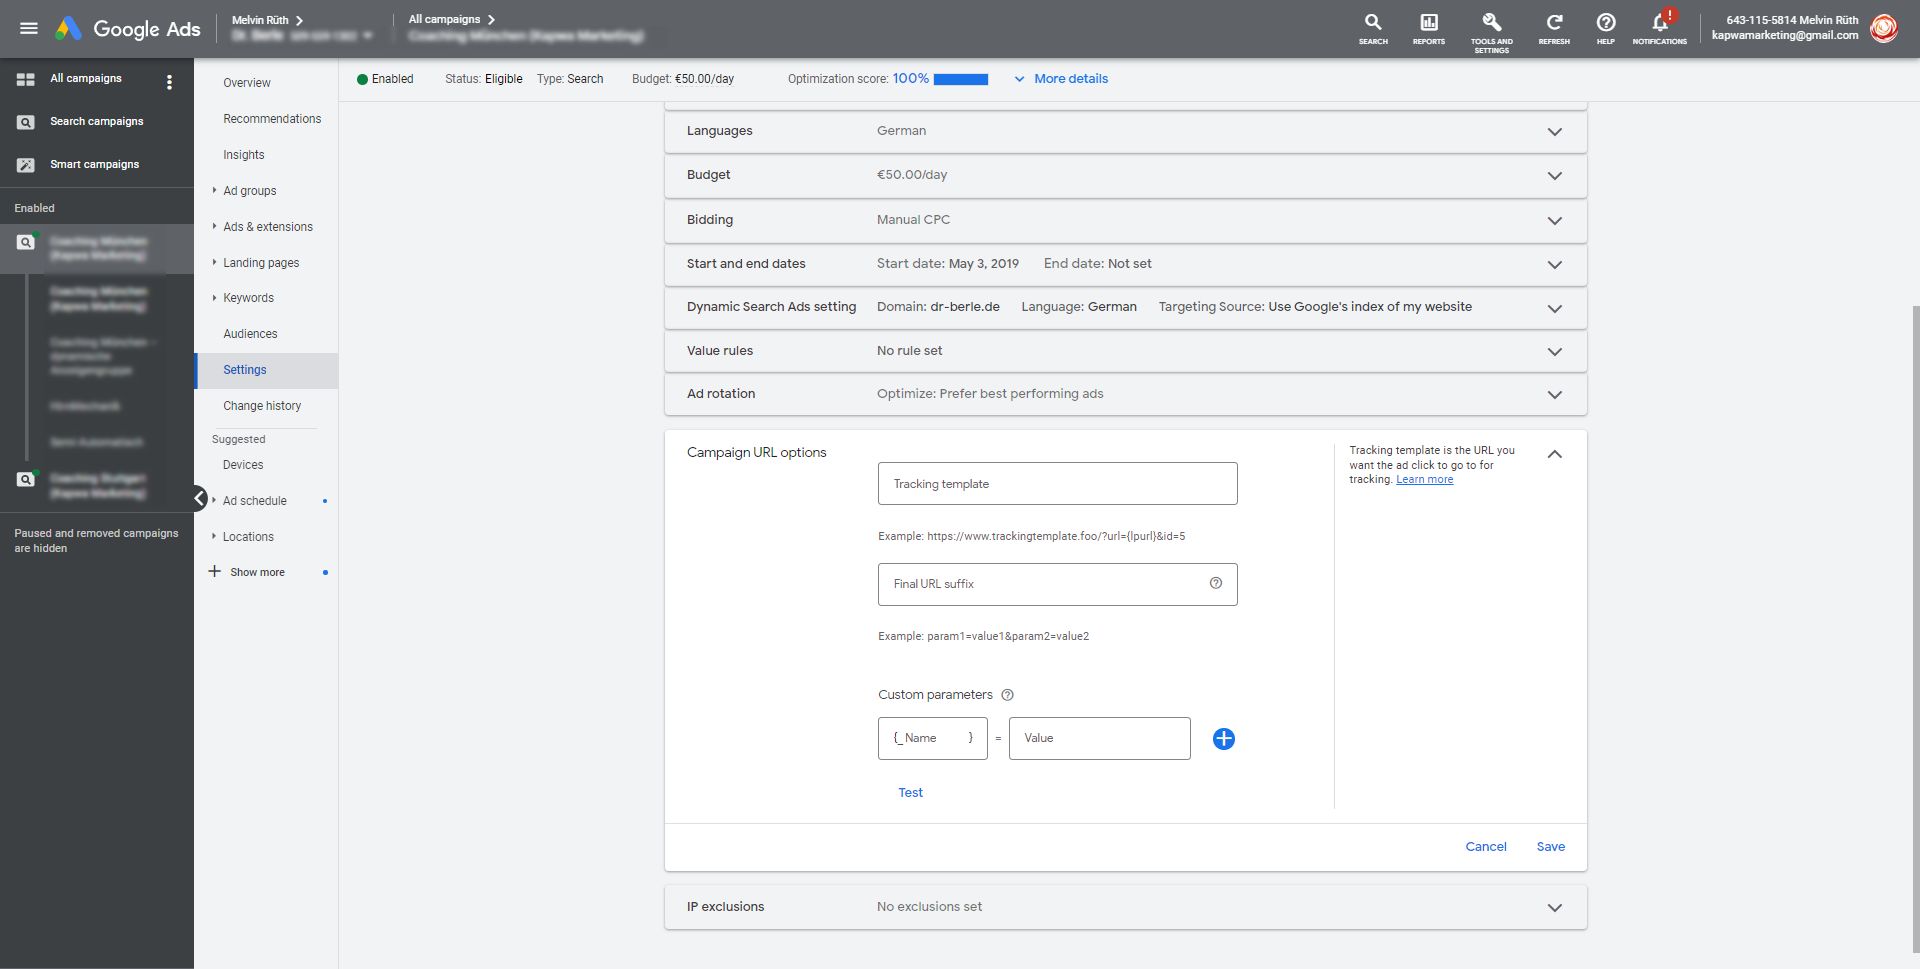
Enter etracker parameters in the Final URL suffix field at campaign level
- In your Google Ads account, click on All campaigns in the left sidebar.
- Click on the campaign whose settings you want to change.
- Click on Settings in the second sidebar with a gray background.
- Click the blue Additional Settings link.
- Click on the Campaign URL Options field.
Now you can enter the parameters from etracker in the “Final URL suffix” field at campaign level:
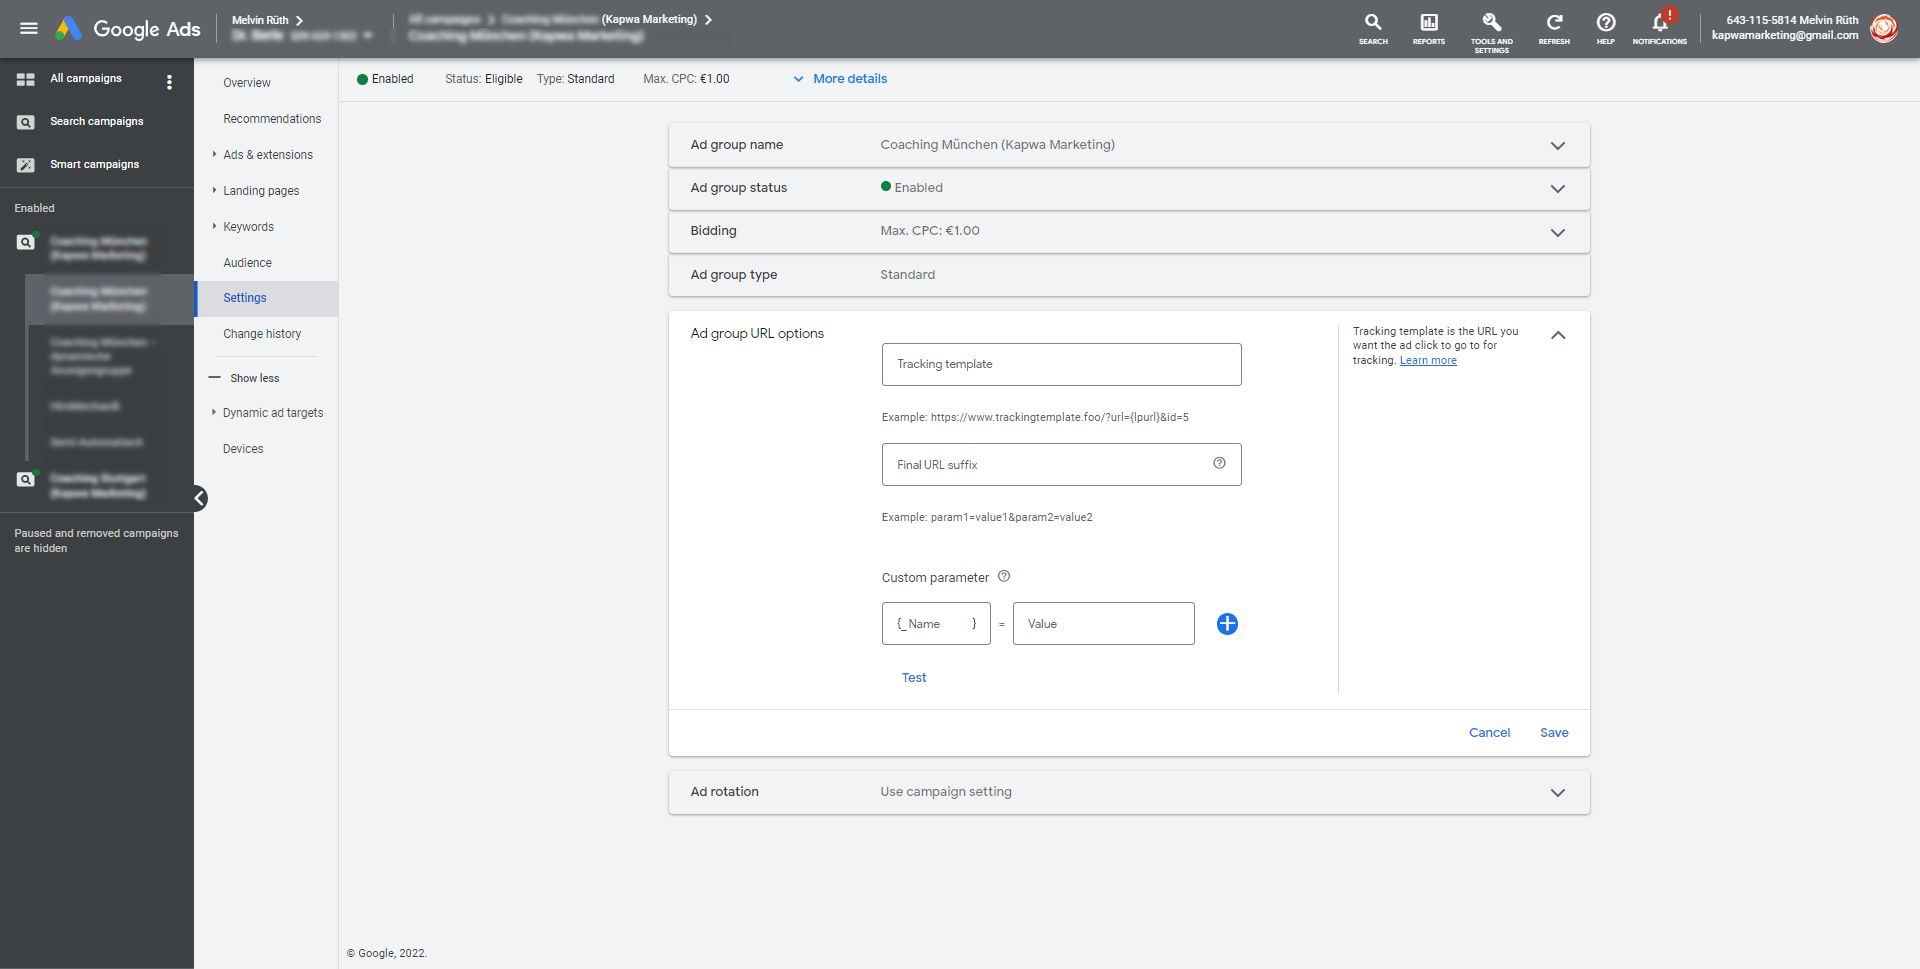
Enter etracker parameters in the Final URL suffix field at ad group level
- In your Google Ads account, click on All campaigns in the left sidebar.
- Click the ad group whose settings you want to change.
- Click on Settings in the second sidebar with a gray background.
- Click the blue Additional Settings link.
- Click on the Ad group URL options field.
Now you can enter the parameters from etracker in the “Final URL suffix” field at ad group level:
Enter etracker parameters in the Final URL suffix field per ad
- In your Google Ads account, click on All campaigns in the left sidebar.
- Click on the ad group that contains the ad you want to edit.
- In the second sidebar with a gray background, click on Ads and extensions and then on Ads.
- Click on the pencil to the right of the ad you want to edit.
- Click on Ad URL options.
Now you can enter the parameters from etracker in the final URL suffix field of the respective Google Ads ad:

As an online marketing agency, we recommend editing the Final URL Suffix field at the campaign level. Why? If you create new ads within a Google Ads campaign whose final URL suffix has already been adjusted, then this suffix also applies to the new ad.
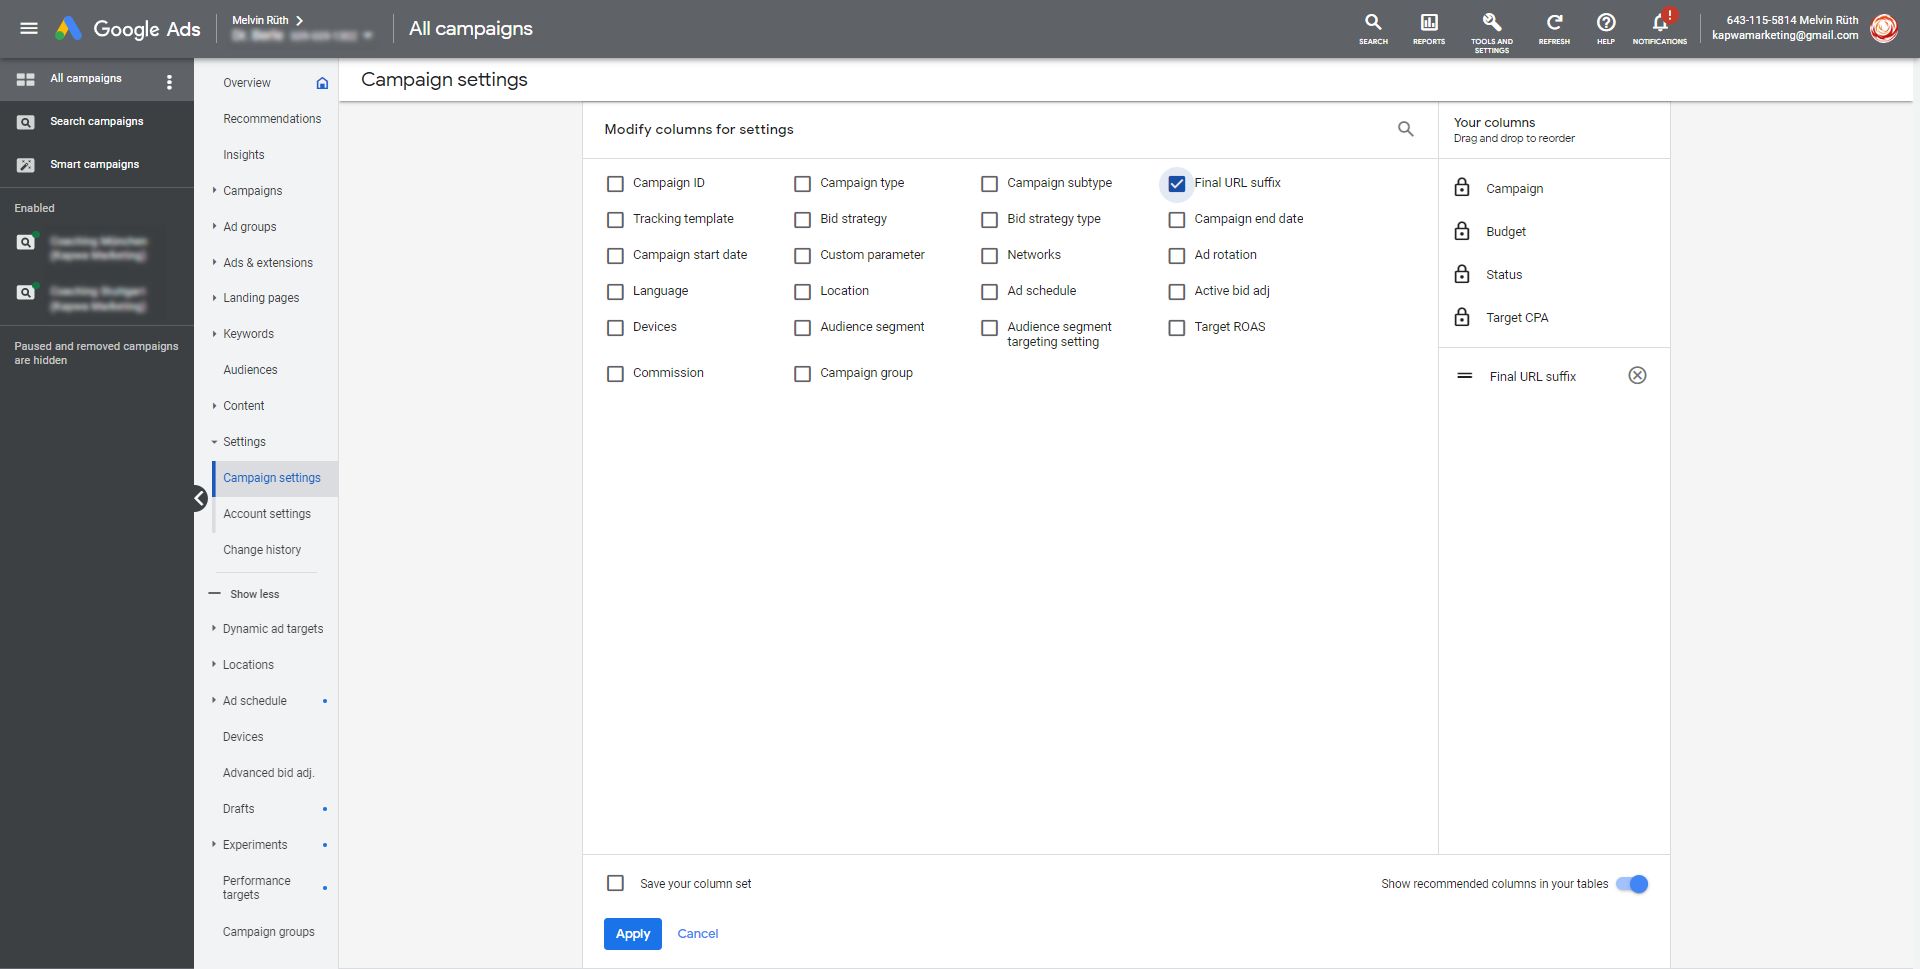
A little tip: If you want to be able to see in the Google Ads “Campaign settings” report which Google Ads campaign already has the parameters from etracker in the “Final URL suffix” field, then simply use the modify columns function and add the column “Final URL Suffix” to your report:
- In your Google Ads account, click on All campaigns in the left sidebar.
- In the second sidebar with a gray background, click on Settings and then on Campaign settings.
- Click on the Columns icon in the top right.
- Check the box next to Final URL Suffix.
- Click on the Apply button.
Upload of etracker conversions to Google Ads: Automatic Google Ads conversion upload
As soon as the campaign tracking just discussed has been set up, the extremely helpful etracker function Google Ads Conversion Upload can be used. Uploading conversion data to Google Ads is automatic and has two major benefits:
- Thanks to the automatic Google Ads conversion upload, you can see and analyze conversions, conversion rates, transactions and sales in your Google Ads performance reports.
- The conversion data that is collected in etracker Analytics and uploaded via Google Ads Conversion Upload enables you to use automatic bid strategies such as “Maximize conversions” or “Target ROAS”.
The Google Ads Conversion Upload feature is one of the main reasons why we think that etracker Analytics is an excellent alternative to Google Analytics. All the more so because the etracker standard configuration works completely without cookies and without the need for consent! Not nearly as much data is lost here as when using Universal Analytics and/or GA4, especially since most users reject statistical cookies!
You are welcome to test etracker Analytics for 30 days free of charge and without obligation!
Configuration of the Google Ads Conversion Upload settings in etracker Analytics
To be able to use the etracker “Google Ads Conversion Upload” function, go to the area in the etracker Analytics Interface where you also found the parameters for the “Final URL suffix” field.
Little Reminder:
- Click on Marketing Reports in the etracker Analytics Interface.
- Under Sources, click on the magic wand next to Paid Media.
After the parameters, you will find the three subcategories: Frequency & Attribution, Conversion Selection, and Source URL.
Frequency & Attribution
Under Frequency & Attribution, you can determine the frequency of the automatic Google Ads Conversion Upload and your preferred attribution model. You can choose from the attribution models Last Ad, First Ad, Linear and Position.
Anyone who uses automatic bid strategies in Google Ads is well advised to choose daily upload. For cookieless tracking, we recommend attribution last ad (default setting).
Important note: The frequency selected in the etracker Analytics interface must match the frequency selected in the Google Ads account!
Conversion Selection
Under Conversion Selection, you select which conversions should be uploaded via Google Ads Conversion Upload. The following options are available to you:
- Orders (Leads)
- Purchases (Sales)
- Target Achievements
- Total all targets
- Selected targets differentiated
Important note: Conversion tracking must be set up separately or is not yet available after the etracker standard configuration has been completed. However, we will soon be releasing detailed step-by-step instructions!
Source URL
Under Source URL you can generate the source URL that is required for the automatic Google Ads Conversion Upload and stored in the Google Ads account. If you have already generated a source URL, you can use the Renew token function to change the source URL.
Setting up the automatic Google Ads Conversion Upload in the Google Ads account
Have you selected and configured all the settings in etracker Analytics according to your preferences? Then you can now go to your Google Ads account to set up the automatic Google Ads conversion upload. The first step is to enter the source URL you generated in etracker Analytics in your Google Ads account:
- In your Google Ads account, click on Tools & Settings on the top bar.
- Under Measurement, click on Conversions.
- Click on Uploads in the left sidebar.
- Click on the Schedules tab.
- Click on the blue button with the white plus sign.
- Under Select source, select HTTPS.
- Enter your individual source URL in the Source URL* field.
- Now select the upload frequency. Important: The frequency selected here must match the frequency selected in etracker Analytics! In other words: For daily uploads (etracker), choose 24 hours (Google Ads).
- Select a time for the daily Google Ads conversion upload. (etracker recommends a time between 3 AM and 8 AM!)
- Click on Save & Preview.
Adding the individual etracker conversion actions
Last but not least, the (etracker) conversion actions must be added to the Google Ads account. And that goes like this:
- In your Google Ads account, click on Tools & Settings on the top bar.
- Under Measurement, click on Conversions.
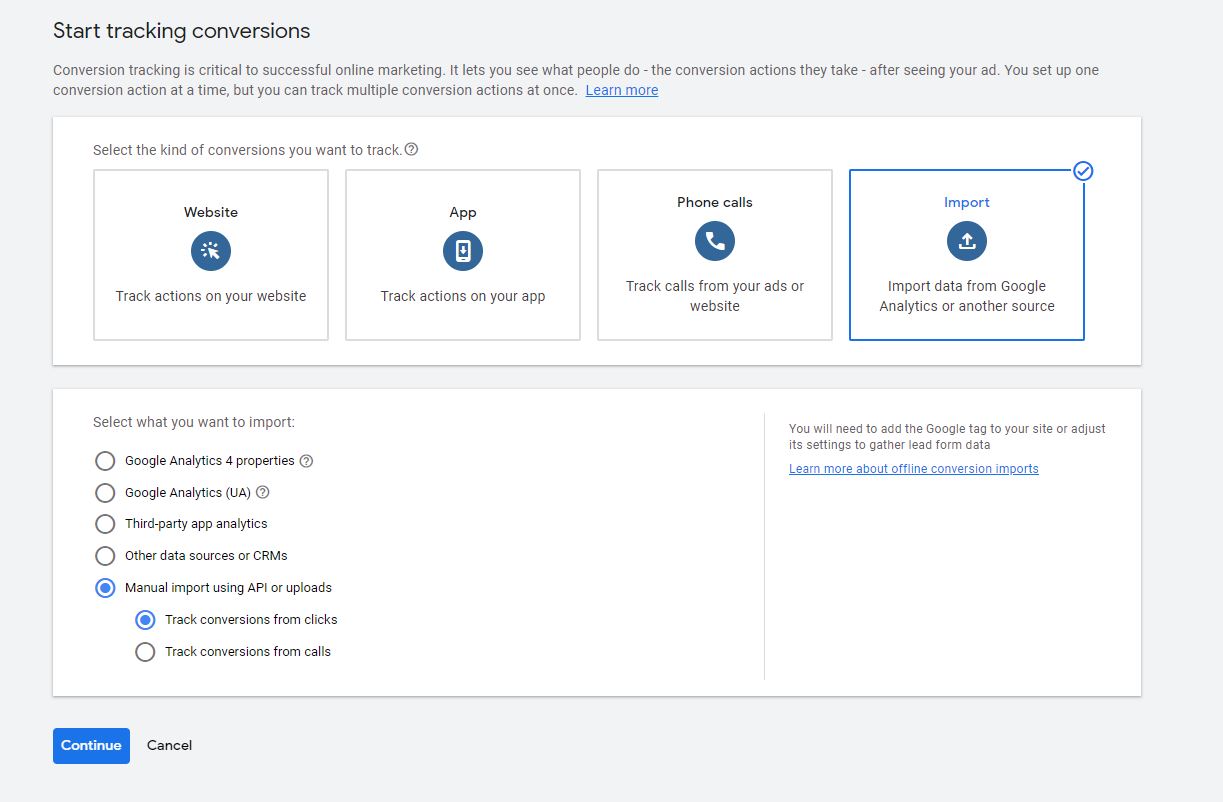
- Click on the blue +New conversion action button.
- Click on the Import field.
- Under Select what you want to import:, select Manual import using API or uploads and Track conversions from clicks.
- Click on the Continue button.
The interface of “Create a conversion action to upload conversions from clicks” appears:
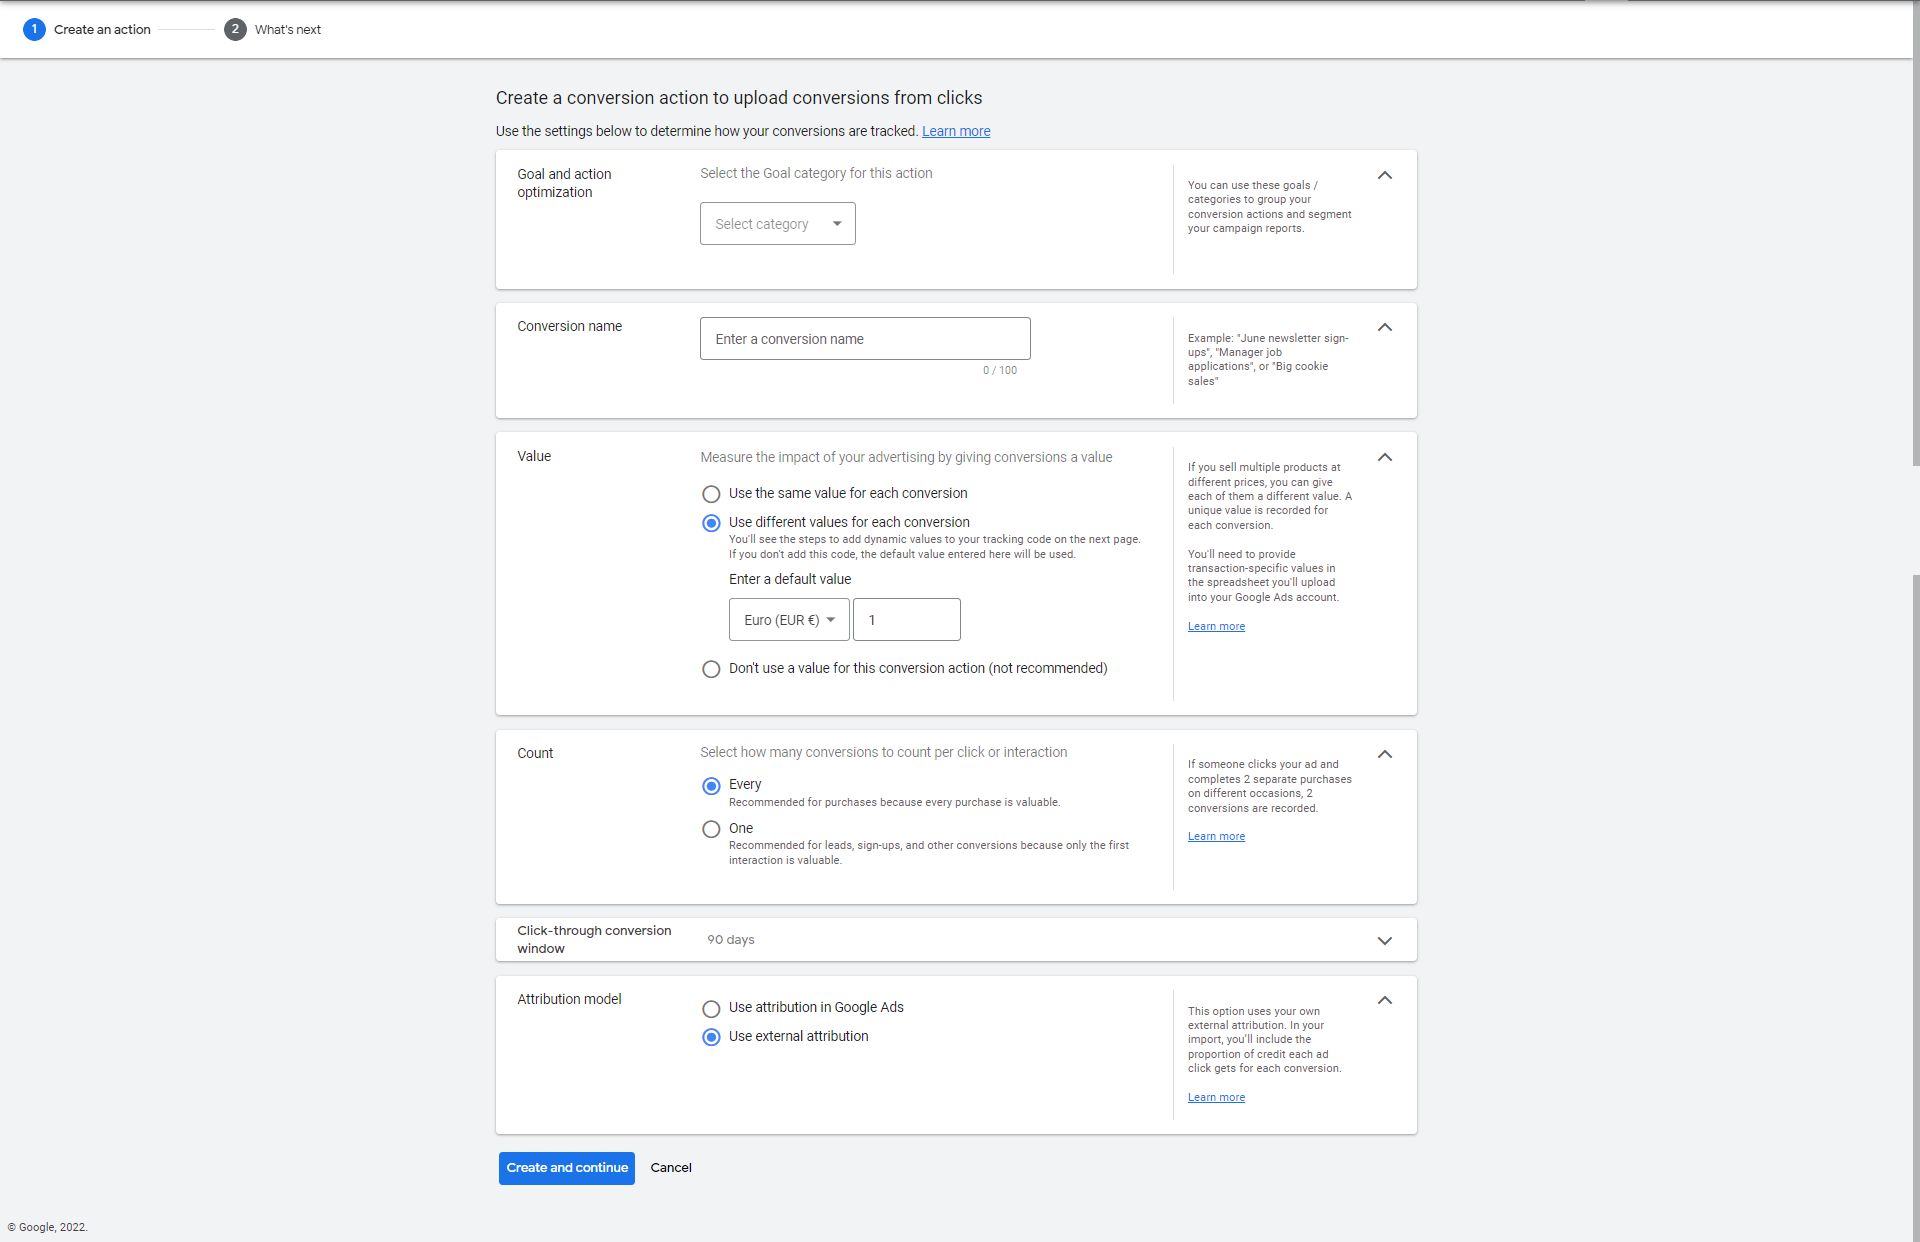
- Under Goal and action optimization, select an appropriate category from the Select category drop-down menu. The following lead categories are available to you: Qualified lead, Converted lead, Contact, Submit lead form, Book appointment, Sign-up, Request quote.
- Now enter the Conversion name:
- For orders: lead
- For purchases: sale
- For all targets in total: target_achievement
- For selected targets: the name of the respective target process as displayed under Basic Reports → Content → Website Targets.
- Now define a value for your conversion action. For contact requests / leads, we recommend using the Use different values for each conversion option and entering a standard value that is as realistic as possible.
- Now select the counting method. The counting method Every is recommended for purchases (sale). The counting method One is recommended for contact requests / registrations.
- Select the Click-through conversion window. (The default setting of 90 days can be retained here.)
- Select Use external attribution as Attribution model so that the attribution model selected in etracker Analytics is used.
- Select Google click identifier as the Method for measuring offline conversions.
Important note: Each etracker conversion action to be taken into account should be created individually in the Google Ads account. For selected targets, the conversion name must correspond exactly to the target process designation, which can also be found in etracker Analytics under Basic Reports → Content → Website Targets. (Please pay attention to upper and lower case letters!)
As soon as all desired conversion actions have been added, the automatic Google Ads conversion upload has been successfully completed. If new website targets are defined in etracker Analytics at a later point in time, it is important to check whether the new website targets should also be added as Google Ads conversion actions.
Concluding remarks on the article “etracker Analytics & Google Ads: Campaign Tracking and Google Ads Conversion Upload”
We have created the above instructions for etracker campaign tracking and the automatic Google Ads conversion upload to the best of our knowledge and belief and hope that they will be helpful and useful for you. However, if you find or have found an error, you are welcome to contact us or use the following comment function.
We would like to emphasize once again that etracker Analytics is a very good alternative to Google Analytics. If you do not yet have an etracker account, you are welcome to test the first-class web analysis tool for 30 days free of charge and without obligation!
This how-to article was updated on November 18th, 2023.